-
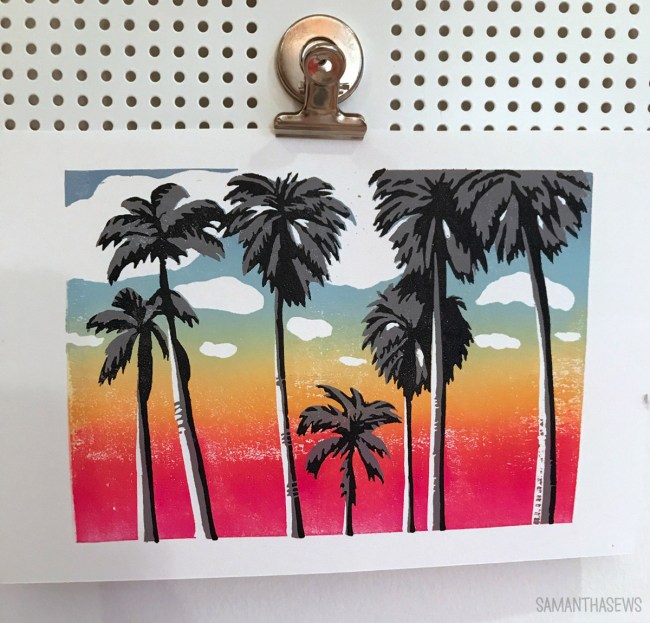
Reduction Block Printing: Rainbow Palm Trees
Over the past few weeks, I’ve been treating myself to what I’m calling Art Camp. Oolite Arts is a Miami Beach-based arts center, with artist residencies, art programs, and classes. Sadly, their classes have been shuttered for months now due to COVID-19 (have you heard about Florida…), but they’ve been offering virtual classes for free. No commute, no pressure, no cost… all that’s left is for me to invest the time.
Hence, Art Camp. Because it’s the weirdest summer ever, so at least I’m going to play with some paint.

I really love block printing so I was excited to join a class exploring reduction block printing, which is a technique I haven’t tried before, taught by Nick Mahshie. He’s the Oolite printmaking resident and a really fantastic teacher.
Reduction block printing produces a layered block print, but each layer comes from the same block – the block is cut away after printing each layer. It requires a LOT of advance planning, because each cut I make in the block impacts the entire future of the design. It’s intimidating because it’s a destructive process by nature. Now that I’ve finished my edition of prints, I can never make more of the exact same, because I’ve carved away and essentially destroyed the parts of the block used to make the first 2 colors of my 3-color print.

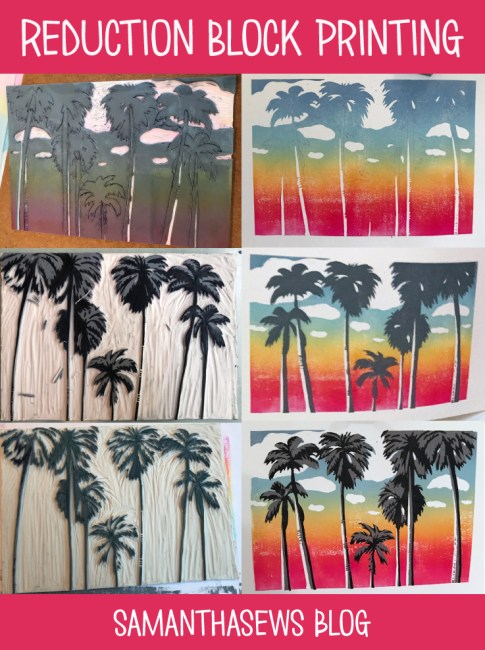
The three stages of my rainbow palm trees block print. The same block is used the whole time, but more material is carved away with each stage. 
For layer 1, I carved away only the whites: the clouds and the highlights along the palm trunks. I had to think of this as “areas where I don’t want ink to be, EVER.” There’s no putting material back once you’ve carved it away.

I had every intention of following the prompt for the class – we all worked from the same source image (a palm tree photo), but each drew our own block images. This process is complicated when attempting it for the first time, so I’m glad the class was structured this way and I was glad we were all on the same page. But when it came time to print, I deviated from the script completely, and abandoned blue sky in favor of this beachy sunset. Because sunset palm trees are the palm trees I know and love.
Printing the gradient was magical. I mixed up four colors: a red-ish magenta, orange, and two shades of blue; and prepped them on an inking plate. As you can see above, I ended up using two inking plates – this helped me get enough surface to really spread the ink properly on the brayer. With one-color prints, it’s easy enough to roll the brayer in all different directions to ensure the whole area is properly inked, but with the gradient it’s crucial to only roll the brayer in one direction. Having more “runway space” with the two inking plates really helped my ink consistency.

After printing this first block, I already loved where this design was going. Next it was time to cut away everything on the block that I wanted to remain “sky”, and this meant cutting the outlines of the palm trees.

I carved away the sky portions of my block, and printed the gray layer of the palm tree silhouettes.

Here, above, is the block from the gray layer. I took this picture after I printed the gray and was starting to carve for the black layer. Planning the outlines for the black layer was tricky, and I found it easiest to draw directly on the block where I wanted the black printed areas to be.

Here is the block for the black layer. Everything is carved away except the final darkest shadows. I had used a washable marker to draw the black shadows, so I washed that away before I started my prints.

The most important part of reduction block printing, or any multi-layer block print, is proper registration. It’s crucial to make sure each layer is aligned, so the overlapping shapes end up where they’re supposed to be. My registration board is just a piece of cardboard, with a rectangle cut to the exact size of the block, and lines drawn on the bottom and right-hand side to align the edges of the paper for each print. I also cut myself a thumb hole to make it easier to remove the block out of the registration jig for each inking.
I also drew a little pencil palm tree on the side to make sure I always placed the block in right-side up! Don’t want any upside-down palm trees.

I made an edition of 12 prints total. I wanted a safe margin because there’s risk of messing up prints at every stage, and, again, there’s no going back and reprinting a previous stage because that block no longer exists. I have a few that didn’t register perfectly – the black and gray layers aren’t quite lined up – but that’s part of the nature of block printing and those prints still have charm. There are also a few where the rainbow gradient is a little blotchy because it was REALLY tough to maintain consistent inking across all the colors. But even that – it’s sky, so as the artist I say that a little bit of blotchiness still… looks like sky!
I was really glad to be working with organic shapes for the first relatively detailed block I’ve carved. The block material is soft, like an eraser, and especially on the final black layer, some of my small details and thin lines just crumbled or peeled away. And this isn’t a big deal, because they’re palm trees! They’re not perfectly uniform anyway. But if I had been trying to carve something like a building, or a design I had been considering – a lifeguard stand – the wiggly lines would become more of an issue. So I may look into different materials in the future if I want to make more precise blocks.
The whole printing process is so satisfying. I love the meditative process of carving, it’s a very “flow” activity for me. I love the methodical work of rolling out the ink for each print, and the sigh of relief when peeling back each successfully printed sheet.
But the best part is the progression. Each stage looked so good. I loved my rainbow sky gradient. It got even better with the gray silhouettes. But that final black detail layer really makes it all pop. Each layer almost felt like it could stand alone, but the final layer comes along and proves them wrong. “This is what you needed,” it says.

I’m taking more classes with Oolite and I highly recommend them! Since they’re virtual, you don’t have to be local. Art Camp for everyone!
I got a lot of questions as I was sharing these prints on Instagram and I hope my explanation of the process is enlightening. It’s such a neat method and I’m really glad I had the chance to try it.
Here’s a sped-up video of me printing the rainbow gradient.
Here’s another outline of the reduction method that really helped everything click for me: Reduction Linocut Method by Natalia Moroz. Such a gorgeous print, too!
And some Pinnables:
-
Woodblock Printing at Jaitex Art in Jaipur
This was the final workshop of our Jaipur trip, and it was a true culmination of everything we’d learned. We drove out to Bagru again, this time to Jaitex Art, for a session on true woodblock printing (as opposed to the mud printing for indigo resist).

first night dinner table, set with our custom blocks When we first signed up for the trip, many moons before departure, we were given the opportunity to each design our own woodblock. Our designs were sent to India, and our blocks were carved by master artisans in preparation for our arrival.
When we all met at the hotel for dinner on the first night, our blocks greeted us by candlelight. It was the cutest gesture and a very warm welcome to a new place with a new group of people.


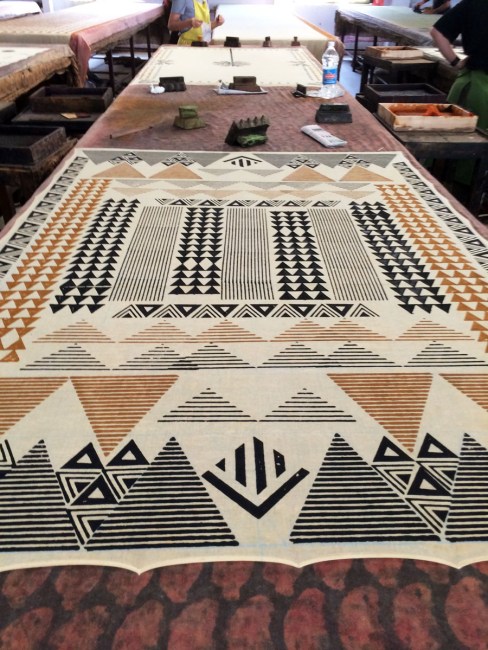
The center photo shows the block I designed, with the two nested triangles. I wanted something that could make some fun repeats and tesselations. To augment our designs, the workshop included a huge table covered in woodblocks that we could use, and that felt like Christmas. It was so hard to choose between the hundreds of blocks, but I grabbed an armful of various triangles and tried my best to just go for it.

The pigments used for these prints were natural dyes. We had access to four colors: black, yellow, red, and brown. I chose to limit my design to just black and yellow because those are my favorites, and I wanted to maintain a very graphic, modern look.
I played with different repeats of my block, and added other triangle blocks where appropriate. I didn’t plan the design out in advance, which was very contrary to my usual style, but my biggest takeaway from the week was to let myself play and be creative. So I just started. I worked my way around the edges, and filled my scarf: triangle by triangle.

I’ve probably said this about every day, but it was so fun to see what everyone else was working on. This project was especially interesting, because we were all working with blocks that we had designed months ago, often with certain intentions in mind. We had all learned so much over the course of the week that many of us ended up making entirely different creations than we anticipated when we first designed that block. And that was pretty awesome.

Every scarf was so beautiful, special, and unique.
This picture makes it look like everyone went with yellow, but the red dye actually looked yellow until it was set with a mordant that set the dye permanently and turned it red.
It’s been fun to go back through these pictures a full three months after the trip. This blog post reminds me that there are so many more things I want to print, and I’d love to try different colors and different variations of my little triangle woodblock. That block and my handprinted scarves are some of the best souvenirs I’ve ever brought home from a trip, and I will cherish them and their memories for a long, long time.

-
Indigo Dyeing with Block Printed Mud Resist
After two days of carving our own rubber blocks, it was time to graduate to real woodblocks, Jaipur-style. We piled into our Innova caravan and headed out to Bagru for our first workshop: Indigo dye with Dabu mud resist.

Before we even began printing, I was blown away by the woodblocks. They are works of art in their own right, and it’s amazing to know that each line, each swirl, is painstakingly carved by hand. Each block is designed with cues to ensure proper alignment with the repeat patterns, and it was so interesting to start to understand how it all works.

We had a huge array of blocks to choose from – it was very hard to narrow down my selections! We started with one practice piece, about 1 meter of muslin, so I took the opportunity to play with a few patterns and see which I liked best.
Printing with the mud was challenging but fun. The mud used in dabu is a special blend of natural materials that includes some portion of clay as well as a natural gum (think xantham gum, or other natural coagulants used to keep sauces shelf-stable and consistent). This blend keeps the mud from washing away when the fabric is dipped in the indigo bath.


The mud was smooth, but drippy and unpredictable. The slightest variation in printing pressure made a big change in the amount of mud left behind by the block. But we would be dipping the scarves in dye, so this was already such an organic process that perfection would be impossible – even, undesirable. With that in mind, I was able to lean in and just print freely, having fun with it. Because, oh my goodness, was it fun.


After printing with the mud, we sprinkled sawdust over all the mudded areas. This helped the mud dry more quickly, and I think it may also give the mud a little more stability – something else to hold onto while it’s submerged in the indigo.
We laid our scarves to dry in the sun, then ate lunch while we waited. They gave us the most adorable box lunches. I don’t know what it is, but there is something so comforting and caring to me about getting a lunch that comes in a cardboard box. I even love those sandwich box lunches you get on planes. Is that weird? This was like that but twice as special because it was obviously packed by hand AND there was paneer.


This was my first time working with indigo dye, and learning about its cultivation and care was fascinating. This indigo vat was a cistern in the ground, 10 feet deep. The indigo dye is a fermented substance, and since this cistern is relatively new (less than 10 years), they bought a culture from a much more established indigo vat – one that was hundreds of years old. It reminded me of sourdough, or beer – a good starter is what makes the magic happen.
They rolled away a giant concrete slab to expose the dye bath, which was covered in a layer of foamy bubbles (above, top left). The dye-er carefully scooped the bubbles out of the bath and into a bucket, then set the bucket aside. After our dyeing was complete, he poured the bubbles back on top of the dye bath. This is important because the bubbles form a protective layer, sealing the dye bath away from oxygen in the air. The indigo color only appears after oxidation – the liquid itself was actually green, as you can see in the photo of the freshly emerging scarf.


waiting for our scarves to dry. After the first dip, we let our scarves dry, and then printed with mud a second time in preparation for a second dip. The scarves were already very blue at this point, so the resist effect from the second application has far less contrast. There was also an option to do the first dip in a gray dye, and then the second dip in indigo, which gave really beautiful results. But I was all in on the indigo, no regrets.


After the dye dried for the second time, the scarves were soaked in water to loosen up the mud. Then, amazingly, one of the workers pulled out each piece of fabric, held it over his shoulder and then SMACKED it on a concrete slab. One by one, our fabrics received a good thrashing, and that seemed to be enough to break up the clay. Then they passed from one rinse bucket to the next, leaving behind less and less blue in the water with each rinse.
Of course, it’s indigo, so it will probably always leave a little bit of blue on anything it rubs against. But I washed my pieces three times (on cold) when I got home, and now at least my scarf doesn’t turn my arms blue when I wear it!

It’s been exactly a month since the day of these photos, and I still can’t believe how wonderful it was. I’m working to incorporate the spirit of that trip into my normal life, and keep making things just for the fun of it. I just started a fantastic new project and I can’t wait to share.

-
Block Printing in Jaipur: Abstract Stripe Block
When I signed up for the trip to Jaipur, I knew I’d love every part of it. It was a whole week that revolved around fabric – what could be better?! But there were two things that were a million times better than I had imagined. First: I was absolutely enthralled with block printing and, more than anything, loved that this class gave me some much-needed creative space to play. And second: everyone on the trip was wonderful, kind, supportive, talented, and FUN.
The combination of these two factors made every single day a treat. On the first few days of the trip, when we were designing our own blocks and printing with Jen, there were great ideas being manifested everywhere. Everyone was working on something unique, and it was pure joy to take a break from carving my own blocks, walk around, and look at the eye candy that everyone else was making.

block printed fabrics created by my trip mates With block printing, it’s impossible to be perfect (unless you’re Brigitte Singh…) and Jen’s attitude, which I worked to emulate, is to: accept that the imperfections will happen, plan for them in your work, and embrace them as part of what makes a handprinted textile so special.
This attitude, the acknowledgement that imperfection is part of the charm of the craft, was so freeing! And as we all began printing gorgeous pieces of textile art, I was constantly inspired. There are infinite options for beautiful blocks and then, once you start playing with repeats, the variety of interesting work you can create is simply boundless.

All that is to say that after I had made my peacock block, I wanted to try something entirely different.
I wanted to make a fabric I’d be likely to sew with and wear, so that pushed me in a more graphic direction. I was also armed with the knowledge that my prints would be imperfect, and those imperfections would make the fabric interesting and beautiful. So I got the basic idea in my head but then I just winged it.

I started by carving a bunch of stripes into one rectangular block. I varied the stripes slightly on purpose (especially since they were bound to vary slightly by accident). I then cut the block into two separate blocks, but I cut it jagged so that each stripe would be a different height.

Then I printed rows. First in a hot pink, because I loved how my test print came out when I borrowed a friend’s pink-inked roller. Then orange, and finally a deep but bright navy.

I had packed a few scrap fabrics for the trip without knowing what I’d be printing. I threw this gray crosshatch print in my suitcase on a whim, and I love the way the overprint plays with the existing pattern.

I had also packed a big cut of this blue chambray, so once I had the striping down, I printed a solid navy variation. It’s so much fun how the same blocks, printed in all one color, can create a fabric with such a different feel than the bright, varied stripes. I’m hoping to make a top or a shirtdress out of this fabric eventually. I didn’t finish printing the full yardage, but lovely Jaime let me take the rest of her blue ink home with me so I can carry on!

Of course, then I couldn’t stop. I printed a border on the pants I was wearing – I had made them for the trip out of the same blue chambray. And then I stamped my arm for a temporary tattoo. Yes, I felt like a rebel.

I posted this photo to Instagram and we all joked that my mom and/or my fiancé would panic and think I had gotten a tattoo. But alas, they were both entirely unfazed.
After those 2.5 days I was thoroughly convinced that I need to spend more time with ink, fabric, and of course my beloved carving tools. I love making things, and block printing has all the best parts. It’s pretty, it’s colorful, it’s nearly limitless, it’s really hard to fail, it has lots of zen/”flow” steps, and after the initial effort to carve the block, the printing is nearly mindless (in a great way). Needless to say, I’m hooked.
-
Block Printing in Jaipur: Peacock Block
At the beginning of October, I went on the trip of a lifetime: Ace Camps Block Printing in Jaipur, India. Day 1 in India marked our first day of class with Jen Hewett (author of Print, Pattern, Sew), who had flown in from San Francisco to teach us block printing and, of course, enjoy the beauty that is Jaipur. Spoiler alert: she’s awesome and teaches a fantastic class.
Our lodgings were a palace-turned-hotel, and my favorite feature of the venue (besides the adorable doors/doorways/alcoves) was the space allocated for our workshop. On a secluded corner of the property, we gathered two to a table and worked beneath the shade of a giant tree. It was bliss.

When I signed up for the class, I had every intention of preparing diligently for my block printing projects. I am nothing if not a planner. But despite the months of time between booking the trip and boarding the plane, I managed to arrive in India with no more preparation than a Pinterest board.
And you know what? I’m thrilled. I didn’t go to India to make things based on my normal – I went to India to see new and different things, to find new and different inspiration.

The night I checked in, I noticed this peacock window grate in the hallway leading to my room. “That would make a neat block,” I thought. Done.
I drew multiple iterations of that peacock, and each time it got simpler and more stylized. I wanted to keep the interesting outer curves of the shape so I could play with repeat patterns. In the end, my design was more modern and less intricate than my inspiration, and I am really happy with this distillation.


Once I had my final sketch, it was time for my favorite part: carving. Carving the blocks is so meditative. The active thinking part is over – once you’ve transferred the sketch, you just have to carve away what doesn’t belong. My hands found their zen and just went for it.

My hands would have been happy to carve all day. So it was for the best when, after probably multiple hours (again, zen, I have no idea), Jen nudged me and said, “I think it’s time for a test print.” She knew I would have kept carving until every line was way more precise than necessary.
I didn’t think my block was done – but it was! And I loved it. That test print was like magic. Once the block was inked, it was real.
The following day, we got to start playing with repeat patterns. I mixed up some peacock teal ink and began printing.

I played with repeat patterns, finding different tessellations where the peacocks naturally aligned with each other. I think this would make such a fun border print for a skirt or dress, and I’m really happy with the way it becomes more of a “pattern” than a “thing” when printed large scale. Like, you can tell they’re peacocks, but they’re also just an interesting visual repeat.

happy printing, making messes and beautiful things 
To finish my design, I carved one tiny teardrop to serve as a feather accent block. I used this micro-block to add gold feathers, randomly placed on each peacock, and it felt like just the right touch.

The rest of the trip, I was seeing peacocks everywhere. I think they were our unofficial tour mascot. Can you spot the peacock in the photo above?? That was one of the two who frequented our hotel trees and lawn. They’re gorgeous and they’re also LOUD! There were many other stylized drawings of peacocks in windows and on shop logos… all of them would have made fantastic blocks.

At night, the lights in the foyer cast perfect peacock shadows on the wall. Our trip mascot, shining through the night.


