-
Navy and Mint Triangle Baby Quilt
When my best friend Hannah announced she was expecting a baby, I was just over the moon. I do look forward to having babies of my own in a few years, but being an aunt or pseudo-aunt is the ideal scenario: plenty of baby photos without the responsibility. (although not nearly enough baby cuddles… thanks, covid.)
Of course, I’m apparently a quilter now, so I wanted to make a quilt for the new baby. Hannah and her husband decided that they wanted to keep the gender a surprise until the baby was born. I started pulling fabrics that would fit their nursery colors of mint green with navy, but quickly realized how “gendered” my fabric stash is. I don’t think many baby boy quilts contain a bunch of floral prints.

So I said to Hannah, “I’m planning to make something for you (okay, not you, your baby), but I probably won’t get too far until A. COVID is gone enough that I can do some good fabric shopping or B. the baby is here so we know its gender.”
We laughed and said something like, “haha I sure hope the pandemic is over before the baby arrives!” Such naïveté. It felt like those many months would be plenty of time for this whole thing to get sorted out.


Suffice to say, Hannah’s baby girl arrived long before the pandemic was over. And my fabric stash was well equipped to make a quilt for a baby girl.
I played with stacks of fabric – this is my absolute favorite part of making a quilt. So many possibilities! And I always find treasures in my stash that I’ve forgotten about. I really wanted to somehow incorporate those chartreuse-esque fabrics on the top-right stack, but I had to remind myself that this quilt is for HANNAH, not for me. And I’m pretty sure Hannah would hate that chartreuse.
I did end up adding one pink floral fabric, but I tried to keep the girliness to a subtle minimum. Hannah’s color scheme already helped with that, but I hope that this quilt can grow with little baby A long after she’s not a little baby anymore.

To give the blocks contrast, I paired a light fabric (mint, white, cream, or pink) with a dark fabric (navy or gray) for each of my HST blocks, so each square has one light and one dark triangle. I sewed them using the “octo awesome method” which is an aptly named, truly awesome technique for sewing eight blocks at once from one big square!

Cut, trim, press. There’s so much tedium to a quilt but it’s also so relaxing and satisfying to work through the repetitive steps. And sewing a quilt for a baby is akin to a prayer. Whenever I didn’t have to think about what I was doing, my mind would wander to baby A… what will she be like as she grows? Will Hannah read to her on this quilt? Will the quilt make it to her big girl bed? In a year or two, will she notice or point out the bunnies and squirrels? It was so fun to send love to this little baby while sewing a tangible manifestation of that love.
Once the blocks were flat, it was time to work through layout.
Block layout is so hard for me. I always want it to be PERFECT, but it’s such an art. Small changes can make a really big difference. It’s also very tactile – the only way I can do it is to lay out as many blocks as I can on my table and move them around until I start to see something that I like. I also find it HUGELY helpful to take pictures as I go, because then I can easily swipe back and forth between pictures on my phone and see what I like better. The photos also help me see more of the big picture and I often notice patterns (good or bad) that I may not have seen otherwise.


These are some of the pictures I took as I worked through the layout for this quilt. It’s a little scary to share them because I’m worried Hannah will see them and think, “oh man I like that other one better!” But it’s so fun to see how incredibly different the quilt looks just by rearranging the blocks.
I played with a flying geese design, just like with Marie’s baby quilt. I love the way flying geese uses triangles and I think it can be really fun and modern. But it wasn’t quite right for these fabrics. I also played with a chevron but I’m worried that chevrons are too much of a current trend, and I wanted this quilt to be more timeless than trendy. Finally I got to pinwheels, and that felt just right. A timeless pattern, but still somewhat modern when sewn from these fabrics. I then mixed up the pinwheel blocks so each 8-triangle block has 2 sets of matching triangles (instead of the default 4-matching). It felt like the perfect blend of structure and randomness.

Taking phone pictures also really helps for putting all the blocks back where they belong in between steps!


Finally, my quilt top was complete! Time for the next challenge: choosing a quilt back. I found this fabric that I had bought in Jaipur last year, and it just felt perfect. Yes, it’s more girly than the front of the quilt, but it’s still not babyish. It also perfectly echoes the tiny flowers on the dusty pink blocks, which I love.

I quilted in straight diagonal lines, again, because if it ain’t broke, don’t fix it. I bound it with solid navy to keep it clean and crisp.
The finished quilt is 40 x 50″, which is pretty big for a baby quilt! Lots of room for baby to roll around and play on, and big enough that it’ll be useful in the future, too. Finished block size was 4 ⅞” per block, for 9 ⅞” per pinwheel foursome. For my reference: I cut my original “octo” squares to 12″. The quilt contains 20 pinwheels, 80 HST blocks, 160 triangles total.

Finally it was finished, and ready to meet baby A!


I took some photos before packing it up… but what good is a baby quilt post without some baby booty!?

And even better with butt ruffle pants. Hannah, you make excellent outfit choices. And thank you so much for taking these pictures… I’m sure you weren’t busy or anything.

This might be my last quilt for a little while, but they were the perfect immersive projects for 2020. I’m so grateful for my sewing room. And, of course, I’m a thousand times more grateful that these pandemic-born babies are so healthy and amazing. It’s a hard time to learn to be a mama and I am so proud of Hannah, Marie, Katie, and all the other new mamas out there.
-
Primary Color HST Baby Quilt
Back in the Before Times, February 2020, I went on a trip that included a stop in Japan, which for me meant a stop in Nippori Textile Town aka Fabric Heaven. My dear friend Marie was expecting a baby, and I wanted to make her a little something… then I found this sheep fabric and it was just PERFECT.

Marie loves knitting, and animals, so by association she loves sheep and alpacas – they’re both adorable AND they help make yarn. I loved these cute baby sheep, plus the fabric was gray – extra perfect since I didn’t know the baby’s gender yet.
By the time I started on the quilt, of course, we were in full stay-at-home, mask-up mode. A trip to Japan was as likely as a trip to Mars. I had just completed my rainbow quilt top, QUILTID-19, and in true quilter fashion, I decided to start another quilt top before actually quilting/finishing my first quilt. So I pulled fabrics from my stash to match the sheep accents: soft red, yellow, aqua, and gray; and started cutting.
After the 500+ triangles that went into QUILTID-19, I treated myself to simplicity this round and cut really big triangles, 10″ each, for a breezy 40 triangles total. The finished quilt came out to about 35 x 44″.


One of the hardest parts of quilting, for me, is laying out the blocks. I always have to play around with the layout and I never feel like it’s just right. Here on the left, you can see my “first draft”. I loved the rainbow gradient of QUILTID-19 so much that I considered trying that again, but it didn’t work AT ALL with these colors or the large blocks. I then pivoted toward a flying geese-based design. I chose the solid gray, red, and aqua as my dark contrast, and the yellow, light gray, and light red as my lights. I think this is a fun way to play with a classic quilt pattern: the large scale and the non matchy-matchy makes it more modern.
It was so refreshing to work with these large blocks and the quilt top came together so quickly!

Next it was time to quilt. I once again used my ill-advised method of basting with just straight pins. This quilt wasn’t too big, so it was much easier to wrestle through my home machine. I also didn’t need to use nearly this many pins!

I quilted with simple diagonal lines again. I like how the minimal quilting keeps quilts more lightweight and “scrunchable”. I also don’t trust myself to do intersecting quilting lines yet… I just know that will cause some puckers to get sewn down on the back of the quilt.

love those little sheepies! I didn’t want to add yet another print, so I bound the quilt in the same solid dark gray that I used for some of the blocks. This also helped to tie in the dark gray blocks, since that was the darkest color on the quilt top. The dark gray border gave it an anchor.

I always make my own quilt binding, and this one I cut on straight grain rather than the bias. Here’s how I bind my quilts. But I did the binding entirely by machine this time! No more hand sewing for me. I used this machine binding tutorial from APQS and intend to machine bind probably all of my future quilts. I also believe that machine binding will hold up better to regular machine washing.
As always, I find Clover wonder clips to be a godsend when it comes to binding.


Finally it was all done and ready to make the long journey to the UK!

Baby Benjamin and his cat friends – I’m not sure whether this is Luna or Tonks (fantastic names) – are big fans. The quilt has been part of tummy time and many a park outing and I’m so, so glad it’s being used and loved!
I also love that many of the fabrics have tiny animals on them (including more tiny sheep!). It’s so fun to think of Baby Ben becoming Toddler Ben and noticing the little zebras, sheep, and elephants on his quilt. Every baby quilt should have a little bit of I Spy to it, I think.
These are my go-to quilting items that I used on this (and every) project:
The Warm Company Warm And Natural Cotton Needled Batting 90″x96″ – this batting is so easy to work with! Natural and not too heavy.
Juki HZL-F600 – My trusty sewing machine. I finally upgraded a few years ago and this machine is just amazing. I wouldn’t have dared to machine quilt anything bigger than a placemat on my old machine.
Clover wonder clips – Perfect for pinching and holding layers together without pins.
-
QUILTID-19 Photoshoot: My Completed Rainbow HST Quilt

She’s DONE! My quarantine quilt, labor of love, darling QUILTID-19. A rainbow of light despite the torrential downpour that is our world these days.


A project of this magnitude deserves an all-out photoshoot, so I folded up the quilt, stuffed it in a backpack, and trekked to the park. This quilt and palm trees were just made for each other. It was such a joy for me to lay out this quilt in the bright sunshine, and I reveled in the fact (fact!) that this quilt is gorgeous. And also the very basic fact that it is finished!

I’m always curious to know what block sizes other quilters use – the ratio of block-to-quilt size has such an impact on the flow of a quilt! So here’s what I ended up with.
- Finished block size: 4 ¼”
- 15 blocks wide x 18 blocks long (270 blocks total, 540 triangles total)
- 67.5″ wide x 81″ long
I used a Queen-sized mattress as my guideline – a regular queen mattress is 60″ wide x 80″ long. So if this quilt goes on a queen bed, it will cover the top but it won’t really overhang the edges. I will probably use this quilt on top of a normal, fluffy comforter as a winter layer, so I don’t mind that it won’t cover the sides of the bed.

Of course, I made this giant quilt while living in Miami, so it’s unlikely to be used on a bed anytime soon! But I’m so glad I took the time to make it and I know I will treasure it for years to come.

Thanks for following along on my quilt journey. I hope you’ve had as much fun as I have watching it come together!

Click here to see all the posts about my Quarantine Quilt, QUILTID-19.
-
QUILTID-19, Part 6: Machine Quilting (on a home machine)
After completing this quilt top in mid-April, I followed what I consider to be a time-honored tradition among quilters: I lovingly folded the completed quilt top and placed it in a drawer to be completed “later”.

In my defense, I had to order batting, and craft supplies have been slow to ship during the pandemic – both because of the generous surge of home mask-making, and because people have been rediscovering the joy of making things with their hands, which are huge things to celebrate! But by the time my batting arrived, I was fully immersed into Me-Made May and excited about garment sewing.
But finally, after about 6 weeks away, my quilt was calling to me again. I didn’t want the pandemic to end without completing my quarantine quilt! And yes, now I realize that was pretty naive of me, as sadly it seems that COVID-19 is nowhere near over. But any motivation is good motivation. So I cleared out all the flat surfaces in the sewing room and started pin basting.

My big cutting table is about as wide as the quilt, so I was able to work in sections for the pin basting by clamping the backing taut to the table, then smoothing the batting on top, then adding my quilt top.


For pin basting, I couldn’t bear the thought of opening and closing the hundreds of safety pins that this huge quilt would require. I also don’t own hundreds of safety pins. So I used regular pins. The Clover flower head pins worked best for this because they’re very long, but I only have 100 of those so the remaining 180 or so pins were my normal long glass-head pins. These still worked, of course, but they weren’t as easy to use.
I put one pin at the center of each of the square blocks, and my blocks are 4.25″ square finished, so my pins were 4.25″ apart in all directions. With a different quilting design I would have wanted more pins, but for my straight lines it worked fine.
I can’t necessarily recommend this method in good conscience because I pricked myself with pins constantly. It’s a lot of wrestling to get the quilt through the machine, line after line, and with all those open pins it was like wrestling a porcupine. But at the same time, I’m probably never going to buy or deal with that many safety pins. So yeah, I’d do this again, scars and all.

I moved my sewing machine table off the wall and butted it up against my cutting table to give me extra surface to work with while quilting.
I had toyed with the idea of free motion quilting and watched some videos, but I couldn’t decide on a design and decided that this quilt was not the time to experiment, both because it is enormous and because it is very precious. I also didn’t want to use a dense design because I wanted the quilt to remain soft, pliable, cuddly. So I kept it simple, just diagonal lines running parallel to the corners of each block (45 degrees).


I didn’t want to run the lines through the corners of the blocks, so I offset them to either side. My biggest reason for this choice was that sewing through the corners would exaggerate any corners that didn’t line up perfectly, or any quilting stitches that weren’t straight. I also think that this offset supports my “gradient” look – it helps to blend the blocks into a cohesive unit, whereas stitching along the edges or corners would emphasize the seams between the blocks.

I laid out my lines with chalk pencil (this Chaco liner is my favorite, the rolling wheel means you always get chalk, it doesn’t soak into the fabric, and it doesn’t get “stuck”). I only laid out 4-5 chalk lines at a time, because the quilt rasslin’ would rub away the chalk eventually. This was also good for my back (and brain) to have alternating activities – wrestle a few rows of stitches through the machine, then lay it out and draw again.


I wore these quilting gloves, they were a Christmas gift from my wonderful mama that I wouldn’t have thought to buy, but they were hugely helpful. Nice and grippy, and of course they also provided an extra layer of protection from the hundreds of pins that tried to attack me at every moment.
If you look closely at the quilting stitches, you can see that on every third line I added an extra line about 3/8″ away. No reason for this, I just wanted something a little more different and fun.
It’s important to note that I sewed every single line in the same direction, from the top left corner of the quilt toward the bottom right. This means that although the quilt back ended up with some wrinkles due to fabric shifting, all those wrinkles are in the same direction. I also used a walking foot – there’s no way I could have done this without one.
The other key to getting a project this size through the machine – don’t make the machine fight gravity. Hopefully all early sewists are taught to not push or pull the fabric through the machine, it’s all about guiding and steering rather than forcing. This is still true for machine quilting, but it’s important to constantly adjust the bulk of the weight so that the machine can easily and evenly feed the fabric. Here, that meant adjusting after every 10″ or so of stitches, balancing more fabric on the table or in my lap so that the fabric under the machine was never taut or dragging.

Wrestling a quilt of this size through a home machine was no joke. I’m very glad I decided to stick with straight lines. I also don’t think it would have worked to do any sort of grid or diamond pattern – think standard quilting – because every single intersection of stitches would have created a big wrinkle in the backing. It’s certainly possible, but I would have needed a LOT more pins and a more stable backing solution than just my four clamps. As with many projects – the method I used was the right choice because it allowed me to get this project DONE.
Click here to see all the posts about my Quarantine Quilt, QUILTID-19.
-
QUILTID-19, Part 5: A Completed Quilt Top
Quilt top DONE! I spent most of Thursday piecing and sewing. I had arranged and pinned the turquoise triangles Wednesday night, so I knew that if I powered through, I could finish both the turquoise section AND the cobalt section to finish the quilt top by Thursday night. It was a lot of sewing for one day, but I’m so excited to have a completed quilt top!
I immediately wrapped it around my shoulders and ran (carefully) down the stairs to show David my “coat of many colors”.

Quilting has been wonderful for keeping my hands busy while my mind wanders or listens to stories and podcasts. I’m always looking for recommendations! Here are a few of my favorites at the moment.
In daily snippets, I’m loving the Robinhood Snacks Daily Podcast. It might not seem like the best time for financial news, but the hosts are goofy and give good perspective on the incredibly volatile market movement lately. It’s interesting to hear how different companies are responding to what the hosts call “the coronaconomy”.
And in longer form, I’ve been listening to Ann Patchett’s This is the Story of a Happy Marriage, a compilation of essays that were previously published in a variety of magazines. It’s always wonderful to listen to an audiobook read by the author, and this is no exception… I love Patchett’s subtle but endearing Tennessee drawl. The essays are the perfect length for sewing entertainment – they’re long for essays, at about 1-1.5 hours each, so they give me a good amount of focused time but then remind me to take breaks. I just completed her novel State of Wonder (in visual-book, not audiobook, form) and was entranced! So it’s fun to listen and absorb her non-fiction writing for some contrast.
And, especially while doing the endless ironing that a quilt requires, I’ve been streaming lots of Bluprint classes (free for another 3 days!). I’m trying to soak up as much about free-motion quilting as I can, because I’m hoping to quilt this one myself on my home machine. I’ve never wrestled a quilt this big through the quilting process, but multiple instructors have shown me that it’s possible, so I’m going to try.

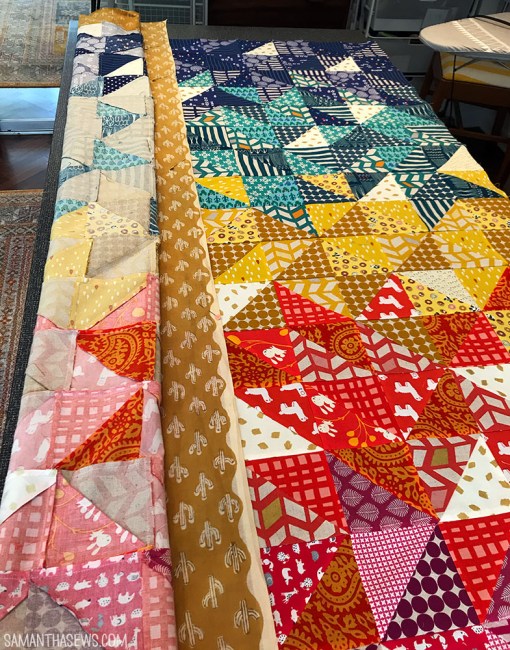
I even chose my backing last week! The majority of my stash is half-yard to 1.5-yard cuts, so I was convinced I’d either have to piece a backing or wait to go to the store (not a great option!). But then I remembered this mustard cactus print. It’s a block print I found in Jaipur, and I loved it so much that I bought five whole yards. Five yards! That’s unheard of for me. And wouldn’t you know, but that’s exactly what I need for this quilt. I have about a foot left over.
It’s always hard to use a fabric that I love so dearly, but as I said at the beginning, a main goal of this quilt is to give life to some of my most beloved fabrics so they’re not just confined in bins forever. So as much as I dreamed of using the mustard cacti to make as many projects as I could… it will be a well-loved quilt back and this is a place of honor for it.
It’s also very, very soft! And was I really going to be able to wear that color? Absolutely not.
Now I’m just waiting on my batting to be shipped by the skeleton crew at Joann’s… but it’s already looking very much like a Real Quilt!
Click here to see all the posts about my Quarantine Quilt, QUILTID-19.


