-
QUILTID-19 Photoshoot: My Completed Rainbow HST Quilt

She’s DONE! My quarantine quilt, labor of love, darling QUILTID-19. A rainbow of light despite the torrential downpour that is our world these days.


A project of this magnitude deserves an all-out photoshoot, so I folded up the quilt, stuffed it in a backpack, and trekked to the park. This quilt and palm trees were just made for each other. It was such a joy for me to lay out this quilt in the bright sunshine, and I reveled in the fact (fact!) that this quilt is gorgeous. And also the very basic fact that it is finished!

I’m always curious to know what block sizes other quilters use – the ratio of block-to-quilt size has such an impact on the flow of a quilt! So here’s what I ended up with.
- Finished block size: 4 ¼”
- 15 blocks wide x 18 blocks long (270 blocks total, 540 triangles total)
- 67.5″ wide x 81″ long
I used a Queen-sized mattress as my guideline – a regular queen mattress is 60″ wide x 80″ long. So if this quilt goes on a queen bed, it will cover the top but it won’t really overhang the edges. I will probably use this quilt on top of a normal, fluffy comforter as a winter layer, so I don’t mind that it won’t cover the sides of the bed.

Of course, I made this giant quilt while living in Miami, so it’s unlikely to be used on a bed anytime soon! But I’m so glad I took the time to make it and I know I will treasure it for years to come.

Thanks for following along on my quilt journey. I hope you’ve had as much fun as I have watching it come together!

Click here to see all the posts about my Quarantine Quilt, QUILTID-19.
-
QUILTID-19, Part 7: Binding
Once the quilting was out of the way, this quilt could basically finish itself. I still had my sewing room rearranged for optimum quilt sewing, so I forced myself to add the binding before I was allowed to restore order. After quilting was finished, I trimmed and squared the whole quilt, and sewed a basting stitch around the perimeter to hold everything in place for binding.

I chose this cobalt blue fabric, which is also included in some of the quilt blocks, for the binding because I love a good striped binding and it coordinates well with the quilt top as well as the quilt back. I cut bias strips at 2.5″ wide and folded them in half, following the instructions in this tutorial: Attaching the Binding – Village Bound Quilts.
I machine-stitched the folded binding to the raw edge, right-to-right on the front with my walking foot. I decided to hand-stitch the final, folded edge on the back. This was slow and tedious, of course – a lot of hand stitching. But I had read a few posts and tutorials on quilt binding, and one of them waxed poetic about the hand stitching process, and that appealed to my sentimental side. I had spent so much time and effort on this quilt, and this was the last step – why not take the time to do it in the neatest way possible, especially when that meant snuggling up with my new quilt on the couch?

I pressed the binding first, so it was already laying with a proper fold. This made the hand sewing very straightforward, but it was still slow. I think I made it around the perimeter in 3-4 movies, probably about 6 hours total (spread over about a week).

But again, this was my view as I did my stitching, so it was a pretty happy place to be.
Tying that final knot was very anticlimactic. I couldn’t believe that after hours and months (and seven blog posts) this quilt was actually, truly, done! Such an accomplishment.
And don’t worry, I gave this quilt the photoshoot it deserves. That was really fun. Stay tuned, because this quilt + palm trees are made for each other.
Click here to see all the posts about my Quarantine Quilt, QUILTID-19.
-
QUILTID-19, Part 6: Machine Quilting (on a home machine)
After completing this quilt top in mid-April, I followed what I consider to be a time-honored tradition among quilters: I lovingly folded the completed quilt top and placed it in a drawer to be completed “later”.

In my defense, I had to order batting, and craft supplies have been slow to ship during the pandemic – both because of the generous surge of home mask-making, and because people have been rediscovering the joy of making things with their hands, which are huge things to celebrate! But by the time my batting arrived, I was fully immersed into Me-Made May and excited about garment sewing.
But finally, after about 6 weeks away, my quilt was calling to me again. I didn’t want the pandemic to end without completing my quarantine quilt! And yes, now I realize that was pretty naive of me, as sadly it seems that COVID-19 is nowhere near over. But any motivation is good motivation. So I cleared out all the flat surfaces in the sewing room and started pin basting.

My big cutting table is about as wide as the quilt, so I was able to work in sections for the pin basting by clamping the backing taut to the table, then smoothing the batting on top, then adding my quilt top.


For pin basting, I couldn’t bear the thought of opening and closing the hundreds of safety pins that this huge quilt would require. I also don’t own hundreds of safety pins. So I used regular pins. The Clover flower head pins worked best for this because they’re very long, but I only have 100 of those so the remaining 180 or so pins were my normal long glass-head pins. These still worked, of course, but they weren’t as easy to use.
I put one pin at the center of each of the square blocks, and my blocks are 4.25″ square finished, so my pins were 4.25″ apart in all directions. With a different quilting design I would have wanted more pins, but for my straight lines it worked fine.
I can’t necessarily recommend this method in good conscience because I pricked myself with pins constantly. It’s a lot of wrestling to get the quilt through the machine, line after line, and with all those open pins it was like wrestling a porcupine. But at the same time, I’m probably never going to buy or deal with that many safety pins. So yeah, I’d do this again, scars and all.

I moved my sewing machine table off the wall and butted it up against my cutting table to give me extra surface to work with while quilting.
I had toyed with the idea of free motion quilting and watched some videos, but I couldn’t decide on a design and decided that this quilt was not the time to experiment, both because it is enormous and because it is very precious. I also didn’t want to use a dense design because I wanted the quilt to remain soft, pliable, cuddly. So I kept it simple, just diagonal lines running parallel to the corners of each block (45 degrees).


I didn’t want to run the lines through the corners of the blocks, so I offset them to either side. My biggest reason for this choice was that sewing through the corners would exaggerate any corners that didn’t line up perfectly, or any quilting stitches that weren’t straight. I also think that this offset supports my “gradient” look – it helps to blend the blocks into a cohesive unit, whereas stitching along the edges or corners would emphasize the seams between the blocks.

I laid out my lines with chalk pencil (this Chaco liner is my favorite, the rolling wheel means you always get chalk, it doesn’t soak into the fabric, and it doesn’t get “stuck”). I only laid out 4-5 chalk lines at a time, because the quilt rasslin’ would rub away the chalk eventually. This was also good for my back (and brain) to have alternating activities – wrestle a few rows of stitches through the machine, then lay it out and draw again.


I wore these quilting gloves, they were a Christmas gift from my wonderful mama that I wouldn’t have thought to buy, but they were hugely helpful. Nice and grippy, and of course they also provided an extra layer of protection from the hundreds of pins that tried to attack me at every moment.
If you look closely at the quilting stitches, you can see that on every third line I added an extra line about 3/8″ away. No reason for this, I just wanted something a little more different and fun.
It’s important to note that I sewed every single line in the same direction, from the top left corner of the quilt toward the bottom right. This means that although the quilt back ended up with some wrinkles due to fabric shifting, all those wrinkles are in the same direction. I also used a walking foot – there’s no way I could have done this without one.
The other key to getting a project this size through the machine – don’t make the machine fight gravity. Hopefully all early sewists are taught to not push or pull the fabric through the machine, it’s all about guiding and steering rather than forcing. This is still true for machine quilting, but it’s important to constantly adjust the bulk of the weight so that the machine can easily and evenly feed the fabric. Here, that meant adjusting after every 10″ or so of stitches, balancing more fabric on the table or in my lap so that the fabric under the machine was never taut or dragging.

Wrestling a quilt of this size through a home machine was no joke. I’m very glad I decided to stick with straight lines. I also don’t think it would have worked to do any sort of grid or diamond pattern – think standard quilting – because every single intersection of stitches would have created a big wrinkle in the backing. It’s certainly possible, but I would have needed a LOT more pins and a more stable backing solution than just my four clamps. As with many projects – the method I used was the right choice because it allowed me to get this project DONE.
Click here to see all the posts about my Quarantine Quilt, QUILTID-19.
-
QUILTID-19, Part 5: A Completed Quilt Top
Quilt top DONE! I spent most of Thursday piecing and sewing. I had arranged and pinned the turquoise triangles Wednesday night, so I knew that if I powered through, I could finish both the turquoise section AND the cobalt section to finish the quilt top by Thursday night. It was a lot of sewing for one day, but I’m so excited to have a completed quilt top!
I immediately wrapped it around my shoulders and ran (carefully) down the stairs to show David my “coat of many colors”.

Quilting has been wonderful for keeping my hands busy while my mind wanders or listens to stories and podcasts. I’m always looking for recommendations! Here are a few of my favorites at the moment.
In daily snippets, I’m loving the Robinhood Snacks Daily Podcast. It might not seem like the best time for financial news, but the hosts are goofy and give good perspective on the incredibly volatile market movement lately. It’s interesting to hear how different companies are responding to what the hosts call “the coronaconomy”.
And in longer form, I’ve been listening to Ann Patchett’s This is the Story of a Happy Marriage, a compilation of essays that were previously published in a variety of magazines. It’s always wonderful to listen to an audiobook read by the author, and this is no exception… I love Patchett’s subtle but endearing Tennessee drawl. The essays are the perfect length for sewing entertainment – they’re long for essays, at about 1-1.5 hours each, so they give me a good amount of focused time but then remind me to take breaks. I just completed her novel State of Wonder (in visual-book, not audiobook, form) and was entranced! So it’s fun to listen and absorb her non-fiction writing for some contrast.
And, especially while doing the endless ironing that a quilt requires, I’ve been streaming lots of Bluprint classes (free for another 3 days!). I’m trying to soak up as much about free-motion quilting as I can, because I’m hoping to quilt this one myself on my home machine. I’ve never wrestled a quilt this big through the quilting process, but multiple instructors have shown me that it’s possible, so I’m going to try.

I even chose my backing last week! The majority of my stash is half-yard to 1.5-yard cuts, so I was convinced I’d either have to piece a backing or wait to go to the store (not a great option!). But then I remembered this mustard cactus print. It’s a block print I found in Jaipur, and I loved it so much that I bought five whole yards. Five yards! That’s unheard of for me. And wouldn’t you know, but that’s exactly what I need for this quilt. I have about a foot left over.
It’s always hard to use a fabric that I love so dearly, but as I said at the beginning, a main goal of this quilt is to give life to some of my most beloved fabrics so they’re not just confined in bins forever. So as much as I dreamed of using the mustard cacti to make as many projects as I could… it will be a well-loved quilt back and this is a place of honor for it.
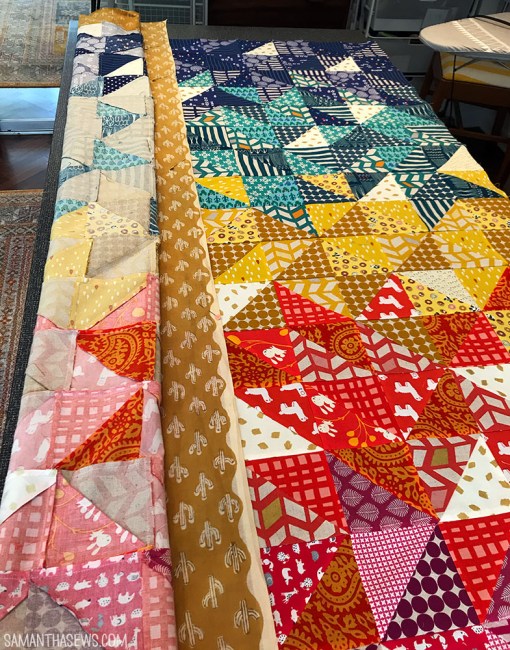
It’s also very, very soft! And was I really going to be able to wear that color? Absolutely not.
Now I’m just waiting on my batting to be shipped by the skeleton crew at Joann’s… but it’s already looking very much like a Real Quilt!
Click here to see all the posts about my Quarantine Quilt, QUILTID-19.
-
QUILTID-19, Part 4: Yellow Done!
Yesterday I completed all the yellow rows, which brought me to 10 finished rows out of 18 total… more than halfway there! I laid out all the turquoise blocks last night, and pinned them all so they’re ready to sew today. After that, all that’s left is blue!

I can’t believe it, but this means by tonight I could have a completed quilt top!

Click here to see all the posts about my Quarantine Quilt, QUILTID-19.


